Time indexes are in the format of hh:mm:ss.nn (hours : minutes : seconds . hundredths)
Controls on the Main Screen
- Drag & Drop Feature - One way to add input files to the current project is to select them in Windows Explorer (Windows) or Finder (Mac OS X), and then do a "drag & drop" into RaceRender's main window.
- File Menu - Start a new project, load a saved project, save the current project, load a template, add input files to the project, Network / WiFi Transfer, change project settings, create an output video file, save a snapshot of the current preview frame, and other options.
- Edit Menu - Use the "Undo" feature, paste an image from the clipboard into the current project as an Embedded Image, or change the "Snap to Grid" option.
- Help Menu - Go to this product documentation, the RaceRender website , the About screen, or the Edition Upgrade screen.
 New /
New /
 Open /
 Save - Starts a new project, opens a project file, or saves
the current project.
 Project Setup - Opens the Project Setup Wizard.
 Timeline - Shows the timeline view,
which is primarily focused on dynamic Display Objects.
Timeline - Shows the timeline view,
which is primarily focused on dynamic Display Objects.- Laps - Displays the lap list for a selected data input file.
 Create Video File - Create an output video file
from the current project.
Create Video File - Create an output video file
from the current project.- Preview Window - Displays a preview of the project at the current time index. Clicking on a visible display object in this preview window will select it in the list on the right. You can click & drag to move it, right-click to view additional options, and double-click to open the properties box. If moving a display object via the click & drag method, there is a "Snap to Grid" feature to help improve alignment; it can be set under the "Edit" menu.
- Preview Setup - Opens the Preview Setup screen
 /
/  - Turns preview audio
off and on
 - Starts or resumes playback from the current time index
 - Pauses playback at the current time index
 - Stops playback and goes back to the beginning
 - Moves the current time index backwards by 0.03 seconds
(1 frame if at 30 FPS)
 - Moves the current time index backwards by 0.15 seconds
(5 frames if at 30 FPS)
 - Moves the current time index forward by 0.03 seconds
(1 frame if at 30 FPS)
 - Moves the current time index forward by 0.15 seconds
(5 frames if at 30 FPS)
- Moves the current time index forward by 0.15 seconds
(5 frames if at 30 FPS)- Full - Plays a full-screen preview.
 - Saves a snapshot of the current preview frame into
a bitmap file
- Saves a snapshot of the current preview frame into
a bitmap file- Time Seek Bar - Click or drag to seek to a different time in the preview.
 - Marks the current preview time as the start time to use
when creating an output video. Control-click to remove the current setting.
 - Marks the current preview time as the start time to use
when creating an output video. Control-click to remove the current setting.
- Marks the current preview time as the start time to use
when creating an output video. Control-click to remove the current setting.- Time Index Display - Displays or sets the current preview time. click on it to change it.
- Project Length Display - Displays or sets the project's length. Click on it to set the desired length, otherwise the length will automatically be based on the input files in the project. The text will be colored blue if it has been manually set, or green if it is being automatically matched to the length of an input file (see the Project Setup Wizard).
- Input Files List - Lists and controls input files in the project.
- Right-Click Feature - Displays a menu for the selected input file where you can create a display object and several other options.
 Add - Takes you to select a media or data file to add to the project
 Config - Configures the selected input file
 Add Display Object - Creates a new display object for the selected input file
 Trim - Trims the start and end of the input file
 Crop - Crops or digitally-zooms the picture of the input file
 Flag - Sets the Start / Finish point to use for laps at this track
 Remove - Removes the selected input file(s), and all related display objects, from the project
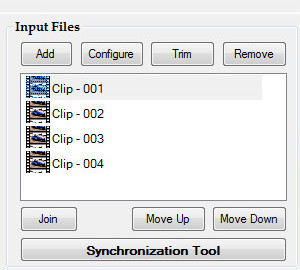
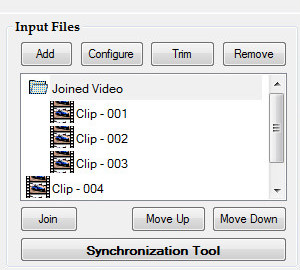
 Join - Joins or un-joins the selected input files. Joining input files
together effectively creates one single input stream from multiple input clips, in
the order shown in this list. In other words, it acts much like a traditional video
editor and connects the input files together sequentially, rather than having them
play concurrently. You can then use the Move Up / Down buttons to change the clip order,
and the Trim Tool to set the length of each clip.
While input trimming and configuration is still applied based on each individual clip, most other functions and selections will only use the joined input object. Each join must consist of only video input files, or only audio input files. When a join is created, any file "Offset Within Project" setting or related display objects may be removed.
- To add an input file to an existing join, select it and only the desired join object, then press the Join button.
- If you need to add a gap between input files in a joined sequence, right-click on a joined input, select Add Time Filler, and then move the newly created time filler object up to the desired position in the sequence. This will add a short delay between the input clips, which can be adjusted by selecting it and then clicking the Trim button.
 Move Up - Moves the selected input files(s) higher in the list. If they
are within a joined input group, this will change their playback order.
 Move Down - Moves the selected input files(s) lower in the list. If they
are within a joined input group, this will change their playback order.
 Synchronization Tool - Synchronizes input files using the pop-up tool
 Side-by-Side - Synchronizes input files using the side-by-side tool
- Display Objects List - Lists and controls display objects in the project. List is based on the drawing order, with top layer objects displayed at the top of the list.
- Right-Click Feature - Displays a menu of available options for the selected display object.
 Add - Creates a new display object
 Setup - Configures the selected display object
 Copy - Creates a duplicate of the selected display object and places it near the original.
 Remove - Removes the selected display object(s) from the project.
 Group - Groups or un-groups the selected display objects. Grouped objects can be moved
and re-sized together as if they were one unit. When grouping objects together, any
timeline segments they currently have will be lost. New segments
can then be created for the entire group. To add an object to an existing group, select it
and only the desired group object, then press the Group button.
 Move Up - Moves the selected display object(s) to a higher drawing layer, causing it
to be drawn on top of others.
 Move Down - Moves the selected display object(s) to a lower drawing layer, causing it
to be drawn below others.
 |
 |
|
|---|---|---|
| Clips 1 - 4 will run concurrently by default. | Clips 1 - 3 are joined together in a sequence called "Joined Video", which runs concurrently with Clip 4. |