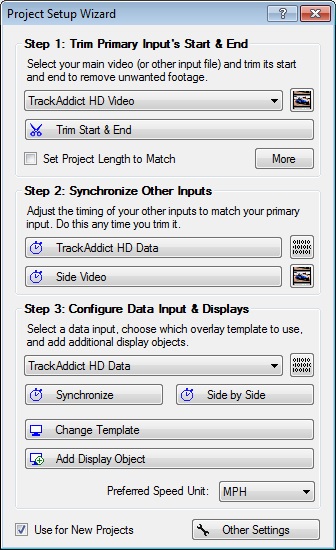

This screen can be reached from the Main screen, using the Project Setup button.
Controls on the Project Setup Wizard
- Step 1: Trim Primary Input's Start & End - Select your main video, then press the
 Trim Start & End button to remove any unwanted footage, so that it only contains the
timespan that you want to show in your project.
 - Set Project Length to Match - Causes the project's length to automatically adjust to match the length of the Primary Input File, so that trimming it will effectively trim the whole project. The project length will then appear green in color on the Main screen.
- More - Shows the Project Settings screen for some additional options.
- Step 2: Synchronize Other Inputs - Adjust the timing of your other input files to
match that of your primary input. Click the
 buttons below to open the
Input Sync Tool for that input file.
- Step 3: Configure Data Input & Displays - Select a data input, choose which template to use, and add additional display objects.
 Synchronize - Opens the Pop-Up Sync Tool
 Side-by-Side - Opens the Side-by-Side Sync Tool
 Change Template - Opens a version of the Template Menu that
displays available data overlay layouts.
 Add Display Object - Opens the Display Object Toolbox to
add an additional display to the project for this data input file.
- Preferred Speed Unit - Enables you to change the unit of measure for displayed speeds in most cases. Changing it here will also set the default for new projects. You may want to also see the "Display Speeds in MPH, Km/h, Knots, or m/s" section of the data overlay documentation for more information.
- Use for New Projects - Causes this Project Setup Wizard to appear automatically when creating a new project using the New Project Menu.
-
 Other Settings - Shows the Project Settings screen for some additional options.
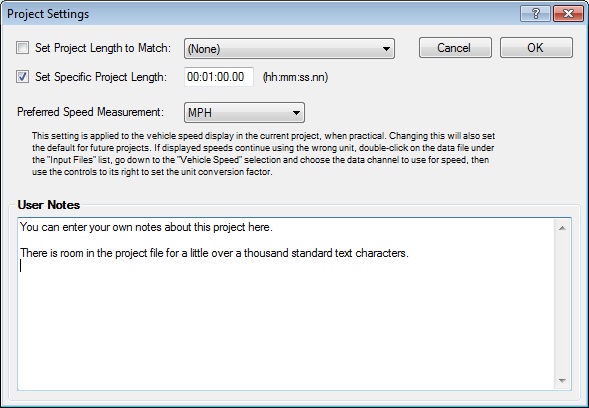
- Set Project Length to Match - See the description in the Project Setup Wizard section above. This works the same way, but also allows you to apply it to an input other than what was selected as your primary input file.
- Manually Set Project Length - By default, project length is based on the input files in the project. This option allows you to manually set the desired project length instead. The project length will then appear blue in color on the Main screen, and it can be set there as well by clicking on it. As with other time indexes in this product, this is in the format of hh:mm:ss.nn (hours:minutes:seconds.subseconds).
- Preferred Speed Measurement - See the Preferred Speed Unit description in the Project Setup Wizard section above.
- User Notes - This is space for you to enter your own notes about the project.