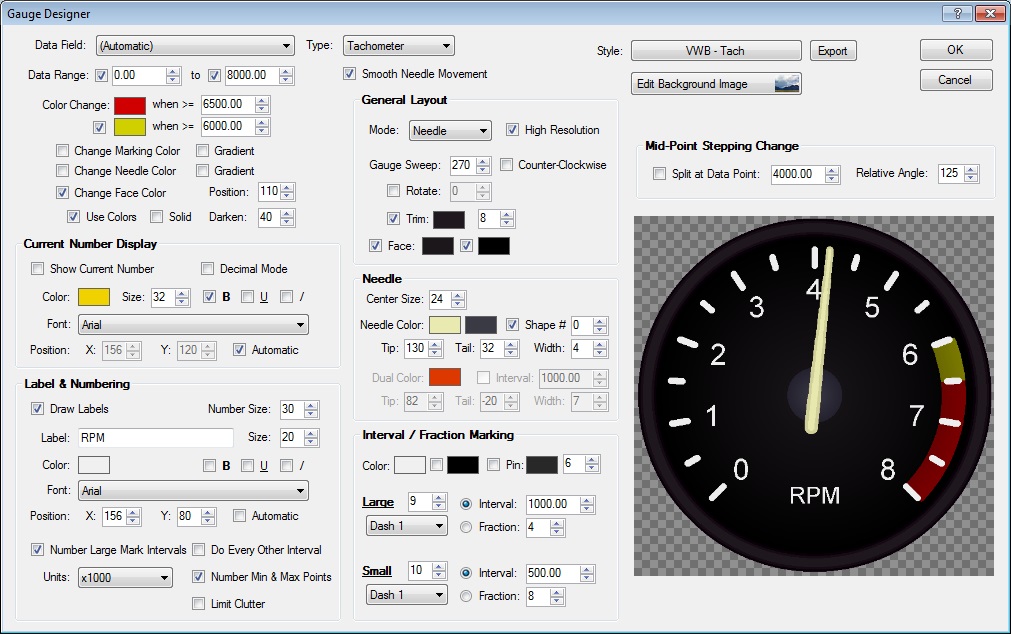
This screen can be reached from the Display Object Properties box for Gauge, Speedometer, and Tachometer display objects.
Controls on the Gauge Designer
- Data Field & Type - Select the data column to use for this gauge. If it is set to "(Automatic)" and the Type is "Speedometer" or "Tachometer", it will use the corresponding data selection from the Input File Configuration screen.
- Style - Import or export a Display Object Style file. Selecting a file will override all current settings with those of the selected file. If you create a gauge that you want to share with other RaceRender 3 users, or another computer, use the Export button to save the current gauge into a file.
- Set Background Image - Open the
Background Image screen,
which allows you to import or edit an image file to use for this gauge's background.
This can be used to make the gauge have a
realistic or custom gauge face.
You may wish to turn off the Face and Trim options so that the background image is visible, and then use the Gauge Sweep, Rotate, and Data Range options to align the needle position and movement to the background. If your background image contains numbers and marks, turn off the Draw Labels and Interval / Fraction Marking options. - Data Range - Sets the minimum and maximum data values to display on the gauge. If a checkbox is un-checked, it will automatically detect that value instead.
- Color Change - Changes the needle, marking, and/or gauge face colors for data points above the specified number. A simple use of this is to put a redline on a tachometer. You will need to check either Change Marking Color, Change Needle Color, or Change Face Color for this to have any effect. The Gradient options will smoothly transition from one color to the next, with full intensity being at the specified data number.
- Current Number Display - If Show Current Number is checked, this will draw the current data number onto the gauge using the selected font and style. The Decimal Mode option will show the number with two decimal places (ie "12.34" instead of just "12"). The Position can be manually adjusted if desired, otherwise it will be automatically placed based on the other gauge options.
- Labels & Numbering - If Draw Labels is checked, this will draw the
specified Text onto the gauge using the selected font and style. The
Position can be manually adjusted if desired, otherwise it will be
automatically placed based on the other gauge options.
- Number Large Mark Intervals - This works along with Interval / Fraction Marking to place numbers next to Large Interval points. You may select Do Every Other Interval to reduce clutter by only marking half of the interval points. The Units selection can be used to reduce the number drawn on the gauge. For example, a tachometer would choose "x1000" or "x100" so that it would display 7 or 70 instead of 7000.
- Do Every Other Interval - Only labels every second Large Interval, which can help reduce clutter or better match a gauge style that you are trying to achieve.
- Limit Clutter - Attempts to create a cleaner and more readable gauge by automatically detecting and removing labels that would be drawn very close to each other. This can override the Do Every Other Interval setting.
- Smooth Needle Movement - This reduces noise in data readings, and corresponding gauge movement, by averaging neighboring data samples together.
- General Layout
- Mode - Selects if this gauge is a needle gauge, dual-needle, or a graph. In Graph mode, colors and settings related to the needle are used to control the graph fill area.
- High Resolution - Improves gauge picture quality, but takes more resources and processing time to render.
- Gauge Sweep - Number of degrees for the gauge to cover. Maximum is 360 degrees.
- Counter-Clockwise - Makes the gauge move in the opposite direction.
- Rotate - Manually sets the gauge orientation (in degrees relative to South). Setting this to zero makes it a hanging gauge, with the zero point being straight down.
- Face - Draws a gauge face (background) of the selected color. If not set, the gauge face will be transparent.
- Trim - Draws an outer trim around the gauge in the selected color and thickness.
- Needle
- Colors - Selects the needle pointer and center section colors.
- Center Size - Needle center section circle size.
- Tip - Length of the needle pointer. This also controls the distance of any Interval / Fraction Markings from the gauge's center.
- Tail - Length of the needle's tail. This may be set to a negative number.
- Width - Needle thickness
- Shape # - Shape the needle so that the tip is smaller than the base.
- Interval / Fraction Marking
- Color - Selects the marking color.
- Pins - Enables minimum / maximum point pins of the selected color and size.
- Large Markings - Sets size, style, and interval for large gauge markings. The Interval value is also used with the Number Large Mark Intervals option.
- Small Markings - Sets size, style, and interval for small gauge markings.