 |  |
This screen can be reached from the Main screen, using the Create Video File button, or from the File menu.
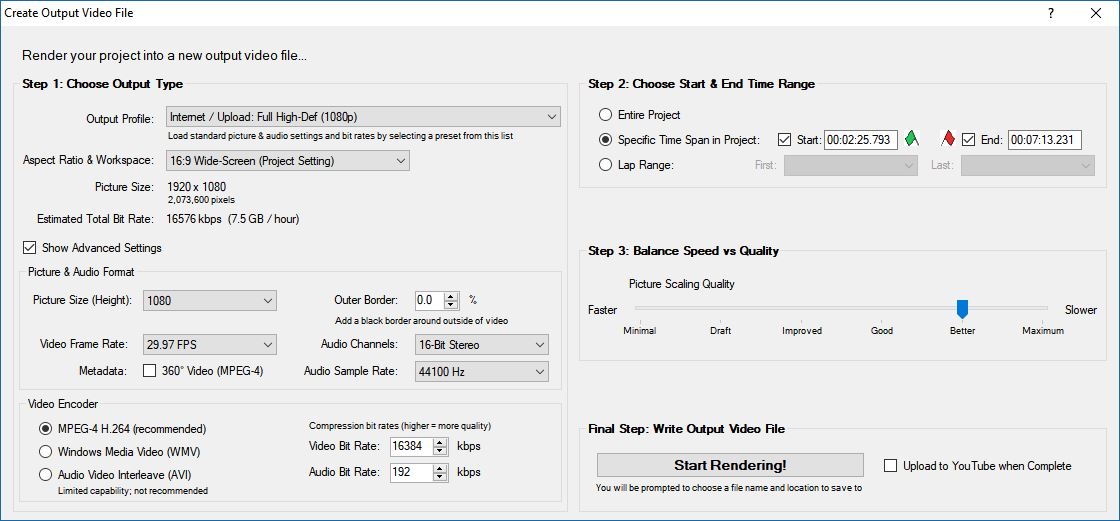
Controls on the Create Video Screen
- Output Profile - Select a preset configuration that fits your intended use
of the video file that you are creating. These options will automatically configure
the picture size, compression bit rates, and certain other settings for you.
- Local File profiles provide high quality, but larger file sizes that may make them more difficult to share with others.
- Internet / Upload profiles sacrifice some quality in the interest of producing a somewhat smaller file size for sharing with others over the Internet. You may wish to increase the Video Bitrate somewhat to enhance quality.
- Television (overscan border) profiles produce high quality and large file size, and add a default black border around the picture (for overscan area) for better viewing on some televisions. This is meant for importing into DVD creation software, or otherwise transmitting to a TV screen, but is a quick solution rather than an ideal one. For best results, use a "Local File" profile and move your overlays and graphics away from the edges of the screen.
- Aspect Ratio & Workspace - Aspect ratio and workspace for the output video render.
This controls both the picture proportions, and the RaceRender project workspace size. For
further explanation, see the
Preview Settings screen documentation.
See Also: 360° Video Projects
If your selection here is different from the aspect ratio selected for your project on the Preview Settings screen, display objects may appear in different proportions and positions than they do in the main preview window. This can be even more noticeable on display objects that are using the Maintain Aspect Ratio option. It is recommended to set the preview screen to the same aspect ratio and workspace setting that you intend to use in your output video file, so that the preview is a more accurate representation. 16:9 is a common choice.
- Advanced Settings
- Picture Size (Height) - Sets video height, with a width calculated from the Aspect Ratio setting.
Choosing a smaller Picture Size can be used with a lower Video Bitrate to reduce file size, as well as improve rendering speed. Selecting a smaller picture size without also lowering the video compression bitrate will result in a sharper and less distorted picture in the smaller size. Some aspect ratio and picture size options are not available with the AVI file format and will cause the format to change to Windows Media or H.264.
The picture size can have a significant impact on rendering performance. Larger sizes will naturally come at a much higher performance cost. See Also: Performance Cost per Video Type - Video Frame Rate - Increasing the number of frames per second can improve the smoothness of the video, while decreasing it can be used with a lower compression bitrate to reduce file size. Decreasing the frame rate without also decreasing the video compression bitrate may result in better picture quality. 29.97 FPS is a typical video frame rate.
- 360° Metadata - This injects 360° spherical metadata into the output file (if using .MP4 format), which is typically needed for it to be processed as a 360° panoramic video by services like YouTube and Facebook. This option is automatically set when selecting a Workspace or Distribution Profile, and then can be changed by the user. See Also: 360° Video Projects
- Outer Border - This creates a black border around the outside of the video image, which is often a convenient (but imperfect) approach to compensate for the fact that some televisions do not show the full width or height of the video. This should not be needed or desired for computer monitors or certain newer televisions. For televisions where this is desirable, a setting of 5% is typical.
- Audio Channels - Enables you to choose between 8 and 16 bit, and Mono and Stereo. This option can help reduce file size when creating AVI files, but does not have any significant impact on Windows Media or MPEG-4 H.264 files, except for the Stereo vs Mono option. If using the MPEG-4 H.264 output format, only 16-bit options are supported.
- Audio Sample Rate - It's best to match this setting to the rate used by your input video and audio sources, or so that one is a multiple of the other. If your video sounds a little bit off, distorted, flat, or has popping / crackling, you may find some improvement by using a different setting here. 44100 Hz 16-Bit Stereo is CD quality, however 48000 Hz is becoming increasingly popular for modern video. When using the MPEG-4 H.264 output format, only 44100 and 48000 Hz are supported.
- File Format - Select MPEG-4 H.264, Windows Media, or AVI output format.
Note: Options listed are for the Windows version; macOS version uses MPEG-4 H.264 only. - MPEG-4 H.264 - Only available on Windows 7 or newer, and macOS. Well known and supported format that typically encodes faster than Windows Media. Works best on Windows 8 or newer, or macOS.
- Windows Media - Microsoft format that supports high-definition video. May take longer to encode than H.264, but can offer higher quality than the Windows 7 H.264 encoder. For Windows 8 or newer, H.264 is recommended.
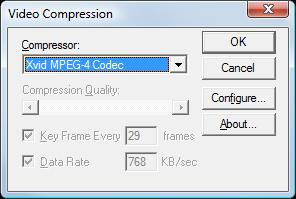
- AVI - Limited to a maximum of 720x480 (DVD resolution). This is an old format that is occasionally still used today, but is generally not recommended. It also depends on Video for Windows (VfW) codecs being installed on your computer. The Xvid codec may offer better quality and speed than the standard Windows AVI encoders.
- Video & Audio Bitrate (kbps) - Lower bitrates will decrease file size at the expense of quality, and may cause "ghosting", a "blocky" picture, and other image artifacts. These settings are not used for AVI files, which may have separate dialog boxes for this: AVI Example 1 AVI Example 2
- Start & End Time Range
- Entire Project - Creates the video file from the entire project.
- Specific Time-Span in Project - Creates the video file from the specified
time range of the current project. The Start time and End time settings are both optional.
If the End time is after the actual project length, it will simply use the project
length instead. These times are automatically filled and selected when the
 /
/
 controls on the Main screen were used to select a time range.
 - Lap Range - Creates the video file to include everything during and between the selected laps of the current project, based on the data input file.
- Picture Scaling Quality - Scaling mode to use. Lower quality can appear jagged or distorted, but may create the video file faster in some cases. The "Good" or "Better" quality levels are recommended for output video.
- Use YouTube Uploader When Complete - This option enables you to upload the video directly to your YouTube account. After selecting the output file that you want to create, the video will start rendering in the background, while the upload screen prompts you for the details of your upload. When rendering is complete, the upload screen will appear again and automatically start uploading your video.